
Table of Contents
- Why Displaying 3D Printed Figures Matters More Than You Think
- Step 1: Choose the Right Display Stand for Your Figure
- Best Display Stands for Articulated Figures: What Works
- Step 2: Use Wall-Mounted Shelves to Save Desk Space
- Step 3: Light Your Collection Like a Pro
- Craft Show Display Ideas for 3D Prints That Sell
- Displaying 3D Printed Fidget Toys for Stress Relief
- Conclusion: Start Showing Off Your Prints Today
- Frequently Asked Questions
Last Updated: September 9, 2026
Why Displaying 3D Printed Figures Matters More Than You Think
A finished print sitting in a drawer might as well be a failed print. The way you display 3d printed figures transforms them from hobby projects into conversation pieces, and it directly affects how long they stay looking sharp. To display 3d printed figures at their best, you need to consider light, stability, and placement from the start. At Bandit's Print Den, we craft articulated figures and desk buddies, and we have learned that a good display setup protects your investment while showing off the detail work.
Displaying 3d printed figures properly matters because PLA and other common filaments are sensitive to prolonged direct sunlight, which causes fading and warping over time. A thoughtful display solves this while turning your collection into intentional decor rather than clutter.
Step 1: Choose the Right Display Stand for Your Figure
Start with the foundation: a stable stand that matches your figure's size and pose. The best display stands for articulated figures account for weight distribution, since a top-heavy dragon or a wide-stance character can tip over on a flimsy base.
For most desktop figures under 8 inches tall, a simple circular or square acrylic base works well. Look for stands with a small peg or a slight recess that holds the figure's feet in place. If your figure has a dynamic pose, consider a stand with an adjustable arm or clear support rod that clips around the waist, preventing stress on the joints.
A common mistake is choosing a stand that is too small. A figure with a wide tail or outstretched wings needs a base at least as wide as its longest dimension. Test stability by gently nudging the figure from the front and side before committing to a spot.
The Stability Equation: Why Figures Tip Over
Most tip-overs are a physics problem you can solve. The stability of any figure on a stand is determined by the relationship between its center of gravity and the footprint of its base. If the center of gravity falls outside the base footprint, the figure will tip.
A figure with a large tail, heavy wings, or a thick weapon will shift it significantly, which is why a figure that looks stable on paper can topple with a slight desk vibration.
Engineering Your Stand: Infill and Base Weight
When designing or printing your own stand, you have two levers to pull: base weight and base width.
Base Width: The simplest fix is to make the base wider. A general rule of thumb is that the base should be at least 60% of the figure's total height in its widest dimension. For a 10-inch tall figure, that means a base at least 6 inches wide.
Base Weight: A wide base is useless if it is too light. A common mistake is printing a stand with low infill to save filament. For display stands, use at least 40% infill. For figures over 8 inches tall or with a high center of gravity, use 60-80% infill or add a solid bottom layer.
The Hidden Weight Trick: Print your base with a hollow cavity and fill it with a dense material. Pause the print at a specific layer height, drop in a few steel nuts or washers, and resume printing. This adds significant mass without increasing the external footprint or using excessive filament.
Material Choice for Bases: PETG is a better choice than PLA for display stands. It is more resistant to heat and has a slight flex that can absorb minor impacts without cracking. For the base itself, consider printing with a higher infill density than the figure.
The 'Footprint Test' for Articulated Figures
Articulated figures present a unique challenge because their movable joints mean the center of gravity shifts with every pose change. Before you settle on a display pose, perform a simple footprint test:
- Place the figure on a flat surface in the pose you intend to display.
- Gently push it from the front, back, and both sides.
- If it tips easily, adjust the pose to bring the center of gravity closer to the center of the feet.
- If the pose is non-negotiable, you need a wider base or a support rod.
Custom Stands for Specific Figure Sizes
Off-the-shelf stands rarely fit perfectly. The best solution for a valuable or fragile figure is to design a custom stand. Use a pair of calipers to measure the exact distance between the figure's feet and the angle of the base, then design a stand with a slight recess that cradles the feet, preventing lateral sliding.
For figures with a single support point (like a figure standing on one leg), a clear acrylic rod that attaches to the back of the figure is often necessary. These rods are available in various diameters and can be bent to fit the contour of the figure, providing crucial support for dynamic poses.
The Bottom Line on Stands
A stand is not an afterthought; it is a structural component of your display. By engineering your stand with the right infill, base weight, and footprint, you eliminate the most common cause of damaged prints: the accidental tip-over.
Best Display Stands for Articulated Figures: What Works
Articulated figures present a unique challenge because their movable joints mean the center of gravity shifts with every pose change. The best display stands for articulated figures are those that lock the pose or support the figure at multiple points.
Three options consistently perform well:
- Pegged acrylic bases for figures standing upright with feet close together
- Clear waist-clip stands for dynamic poses like jumping or flying
- Modular tiered risers for displaying multiple figures at different heights
A tiered riser lets you position figures so each one is visible without blocking the ones behind it. This is especially effective for collections of similar scale, like a lineup of fantasy creatures or gaming characters.
| Stand Type | Best For | Stability | Cost Range |
|---|---|---|---|
| Pegged acrylic base | Upright figures | High | Low |
| Waist-clip stand | Dynamic poses | Medium | Medium |
| Tiered riser | Multiple figures | High | Medium |
| Wall-mounted bracket | Large or heavy pieces | Very high | Low |
Step 2: Use Wall-Mounted Shelves to Save Desk Space
Desk space runs out fast when you collect figures. Wall-mounted shelves free up your workspace while turning your collection into a visual feature of the room. This approach works especially well for figures that are too large for a standard desk riser or for collections that keep growing.
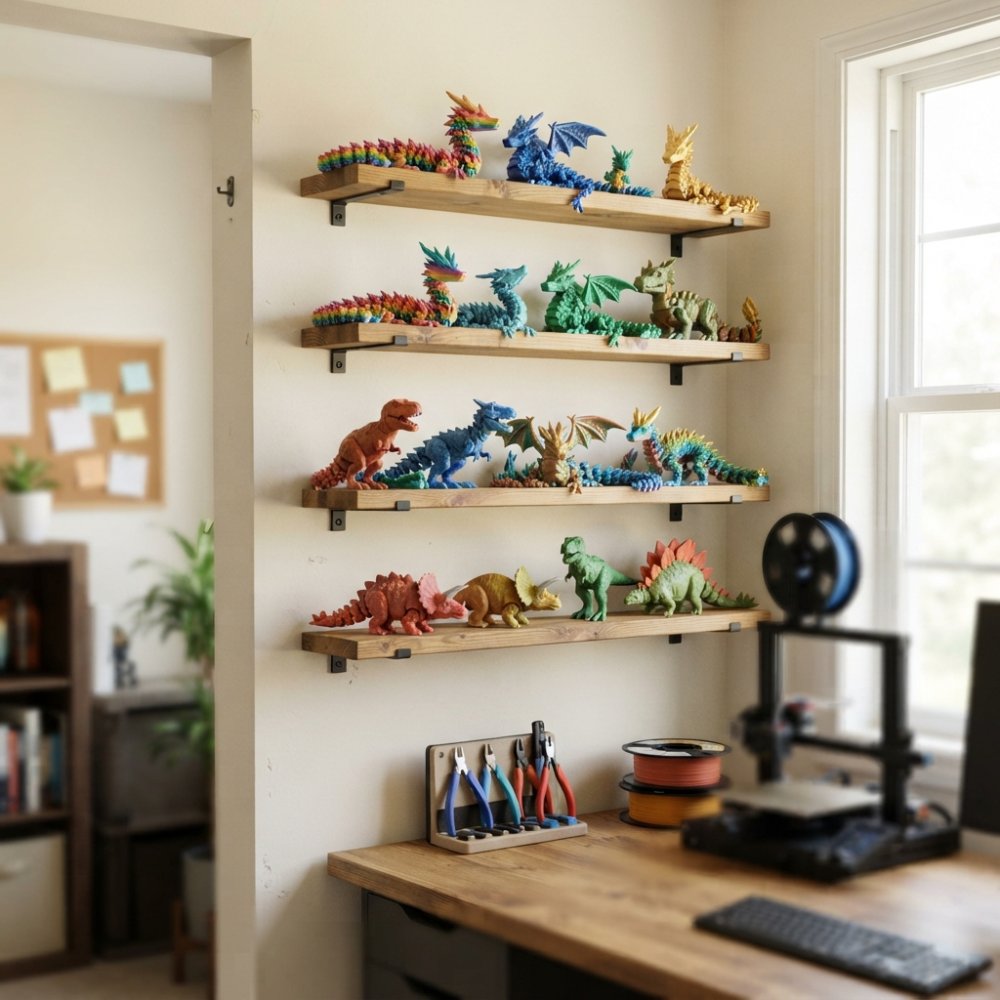
Install floating shelves at eye level or slightly above, about 12 to 16 inches apart vertically. This spacing accommodates most figures up to 10 inches tall while leaving room to grab them without knocking over neighbors. Use shelves with a front lip or raised edge for safety against accidental pushes.
Weight distribution matters more than most collectors realize. A shelf rated for 20 pounds can still sag if all the weight sits at the center. Spread figures evenly across the shelf, placing heavier pieces near the wall anchors or bracket points.
Step 3: Light Your Collection Like a Pro
Lighting is the difference between a shelf of toys and a curated display. Proper lighting highlights the layer detail, paint work, and surface finish that make each print unique. Poor lighting flattens depth and can cast harsh shadows that hide your best work.
Most display guides stop at 'use a lamp.' To truly elevate your collection, you need to integrate lighting directly into your display system. This is the single most impactful upgrade you can make, and it is easier than you think.
The LED Strip Integration Guide
LED strip lights are the most flexible option for a 3D printed figure display. The key is to move beyond simply placing a strip on a shelf and instead build a lighting channel into your display itself.
The 45-Degree Rule for Texture: Position your light source at a 30 to 45-degree angle above and in front of the figures, not directly overhead. This 'raking light' creates subtle shadows that emphasize the texture of your print layers and any post-processing work.
Color Temperature Matters: Warm white light around 3000K flatters most filament colors, making them look richer and more vibrant. Cooler light around 5000K is better for displaying fine surface detail and inspecting paint work, but it can make some colors look washed out. A dual-temperature strip with a remote control lets you switch between 'display mode' and 'inspection mode.'
DIY Lighting Channels: Instead of just taping a strip to the underside of a shelf, consider printing a simple channel or diffuser. A 3D printed channel that holds the LED strip and angles it toward the figures below will prevent hot spots and glare.
Power and Wiring: For a clean look, plan your power routing. Use a low-voltage (12V or 24V) LED strip and a single power supply. Run the wiring along the back edge of the shelf and use cable clips to keep it tidy.
Battery-Powered Options for Enclosed Cases
Battery-powered puck lights work well inside enclosed display cases, and they avoid the need to run wiring. If you use a glass-front cabinet, place the lights at the top front edge pointing backward and downward, illuminating figures without creating glare on the glass.
For a more advanced setup, consider using a magnetic USB rechargeable puck light. These can be mounted with a small metal plate that you glue to the inside of your case, allowing you to remove the light for recharging without disturbing the display.
The 'Shadow Box' Technique for Single Figures
For a hero piece, consider a shadow box approach. Use a deep frame or a 3D printed enclosure with a single, focused light source. A small, directional spot light can create a dramatic pool of light that isolates the figure and makes it look like a museum exhibit.
Light and Material Interaction
Be mindful of how light interacts with your filament. Glow-in-the-dark filaments need a strong charge from a bright light source to perform well. Translucent filaments look stunning when backlit, so consider placing a small LED panel behind a translucent figure to make it glow. Avoid placing any light source in direct contact with the print, as heat buildup can soften PLA over time.
The Bottom Line on Lighting
A well-lit display is a curated display. By integrating LED strips with a diffuser and angling them correctly, you transform a collection of plastic models into a professional-looking showcase. The initial setup takes an afternoon, but the payoff is a display that looks intentional and premium.
Craft Show Display Ideas for 3D Prints That Sell
Vendors face a different challenge than collectors: the display must attract attention, communicate quality, and survive transport. Craft show display ideas for 3d prints revolve around density, height variation, and clear pricing.
A professional vendor display aesthetic starts with risers. Use tiered shelves to create three distinct height levels across your table, drawing the eye across the full display. Group figures by theme or color family, since visual cohesion makes a table look curated rather than cluttered.
Stability is non-negotiable at outdoor events. A gust of wind can topple an entire table of lightweight prints. Secure tablecloths with clips, weigh down the base of each riser, and consider acrylic display cases for smaller or more fragile items. A countertop NFC display lets customers tap their phones to connect instantly.
Dust protection matters during multi-day events. Cover your display overnight with a fitted sheet or lightweight plastic sheeting to prevent dust buildup and protect prints from moisture.
Displaying 3D Printed Fidget Toys for Stress Relief
3d printed fidget toys for stress relief serve a different purpose than collectible figures, and their display should reflect that. These pieces need to be within arm's reach during work or study, not locked behind glass.
A small desk organizer with individual compartments keeps fidget toys accessible without letting them scatter across your workspace. Look for a tray with dividers that match the size of your toys. Articulated fidget dragons and similar pieces can stand upright in a shallow cup or small vase when not in use, doubling as a desk accent.
For fidget toys used during meetings or focused work, position them at the edge of your primary work area, within easy grabbing distance but out of the way of your keyboard and mouse. A dedicated "fidget zone" at the corner of the desk keeps the items visible and ready without creating clutter.
Conclusion: Start Showing Off Your Prints Today
Your prints deserve better than a drawer or a crowded, dusty shelf. Start with a stable stand that matches your figure's pose, add wall-mounted shelving to reclaim desk space, and finish with angled lighting that reveals the craftsmanship in every layer.
At Bandit's Print Den, we build every articulated figure to be displayed and enjoyed. Our mobile studio crafts detailed collectibles, desk buddies, and custom projects, all quality-checked by our resident expert, Bandit. Explore our collection of articulated figures and desk accessories, and get started with Bandit's Print Den to find your next centerpiece.
Frequently Asked Questions
What are the best materials for 3D printed figure display stands?
Acrylic stands offer a clean, modern look and let the figure be the star. For heavier figures, look for stands made from wood or metal that can handle the weight without tipping. Many collectors prefer 3D printed stands with a matte finish to match their figures. Consider the weight distribution of your figure when choosing a material, and always check the stand's weight rating before buying.
How do you prevent 3D printed figures from falling over on shelves?
Stability starts with weight distribution. Place heavier figures on lower shelves and use display stands with a wider base for top-heavy articulated models. For extra security, use a small amount of museum putty or double-sided adhesive tape under the base. If you're displaying several figures, make sure the shelf itself is level and securely anchored to the wall.
Are there specific lighting techniques to highlight articulated 3D prints?
Use small LED spotlights or strip lights aimed at the figures from a 45-degree angle to show off the details and layer lines. Avoid harsh overhead lighting that creates glare. For a dramatic look, try a darker background with warm white lighting. This approach works well for both home shelves and craft show displays to make your prints stand out.
How do I keep my 3D printed figures dust-free on display?
Dust settles into the layer lines of 3D prints, making them look dull. Use a soft, dry paintbrush or a can of compressed air to gently remove dust weekly. For deeper cleaning, wipe with a slightly damp microfiber cloth. If you want to minimize dust, use an enclosed display case or a glass cabinet, which also protects figures from accidental bumps.
0 comments