
Table of Contents
- Diagnose Your Failed 3D Print
- Fix 3D Printer Bed Adhesion Tips
- How to Fix 3D Print Stringing
- Address 3D Printing Under-Extrusion Causes
- Resolve Warping, Layer Shifting, and Over-Extrusion
- Optimize Supports and Cooling for Better Prints
- Maintain Your Printer to Prevent Future Failures
- Frequently Asked Questions
Last Updated: October 2, 2026
Diagnose Your Failed 3D Print
When you need to troubleshoot failed 3d prints, remember that each failure is frustrating but also your printer's way of telling you something needs attention. The good news: most failures follow predictable patterns. Once you know what to look for, fixing them becomes straightforward.
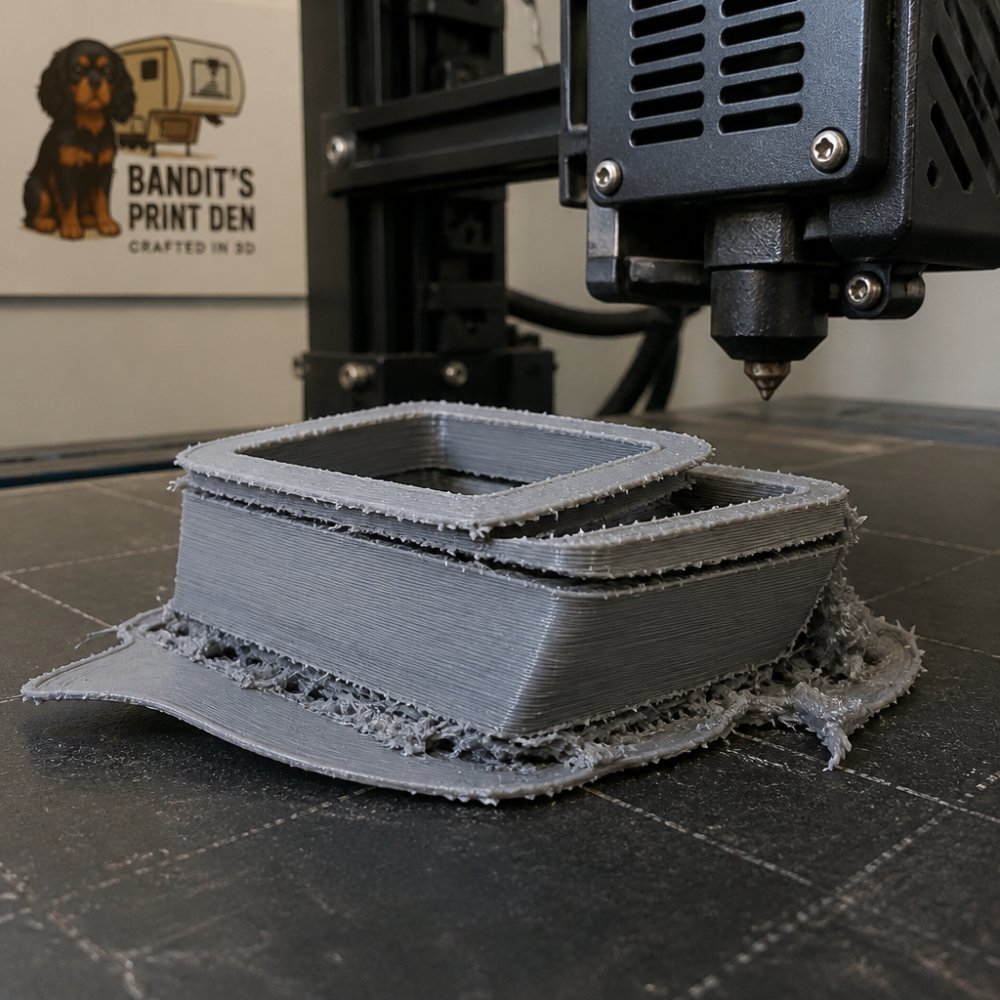
Most failures fall into a handful of predictable categories. Learning to diagnose which one applies to your print is the first step toward prevention.
Inspect the Print Failure
Start by examining the failed print itself. Don't throw it away yet, it's evidence.
Look for these visible signs:
- Layer lines or poor surface quality point to extrusion or temperature issues
- Warping or curling edges suggest bed temperature or adhesion problems
- Gaps between layers indicate under-extrusion or nozzle clogging
- Smooth, glossy appearance might mean over-extrusion
- Stringy or oozy sections show retraction settings need adjustment
Take photos from multiple angles to track patterns over time.
Identify When the Failure Occurred
The timing of failure tells you almost everything.
First layer failure means bed adhesion or z-offset problems. The print never stuck properly. Check your build plate cleanliness and leveling first.
Mid-print failure (layers 5-50) usually points to filament path issues, nozzle clogging, or stepper motor skipping.
Fix 3D Printer Bed Adhesion Tips
Bed adhesion is the foundation of every successful print. Poor adhesion causes first layer failures that cascade into complete print loss.
Clean and Level Your Build Plate
Your build plate needs two things: cleanliness and proper distance from the nozzle.
Cleaning steps:
- Remove the build plate from your printer
- Wash with warm soapy water and a soft brush
- Dry completely with a lint-free cloth
- Wipe with isopropyl alcohol on a clean cloth
- Let dry before reinstalling
Leveling your bed:
- Heat the nozzle to printing temperature
- Move the nozzle to each corner of the build plate
- Slide a piece of paper under the nozzle
- Adjust until the paper has slight resistance
- Move to the center and check again
- Repeat until all points feel equal
Adjust Z-Offset and First Layer Settings
Even a perfectly leveled bed might need fine-tuning through your slicer settings.
Z-offset adjustments move the entire nozzle up or down relative to the bed:
- If the nozzle squishes filament too hard, increase z-offset (move nozzle up)
- If filament doesn't stick, decrease z-offset (move nozzle closer)
- Make adjustments in 0.1mm increments
- Test one change at a time
First layer settings in your slicer also matter:
- Slower print speed for layer one (25% slower than normal)
- Higher bed temperature for the first few layers
- Wider line width for better adhesion
- No fan or minimal fan speed during first layer
How to Fix 3D Print Stringing
Stringing is the spider-web filament between separate parts. It signals imprecise filament flow control.
Tune Retraction Settings
Retraction pulls filament back into the nozzle when the printer moves without printing. This prevents oozing and stringing.
Basic retraction settings to adjust:
- Retraction distance: 4-8mm for direct drive, 8-15mm for Bowden
- Retraction speed: 40-60 mm/s (faster is better, but too fast causes jams)
- Z-hop: 0.2-0.5mm lift when retracting (prevents scratching prints)
Adjust Nozzle Temperature and Print Speed
Temperature and speed work together to control how filament flows.
Address 3D Printing Under-Extrusion Causes
Under-extrusion means insufficient filament output, resulting in weak, gap-filled layers.
Check Filament Path and Nozzle Clogging
Start with the simplest cause: a blocked path.
Remove filament and look through the extruder opening toward the nozzle with a light. If you can't see through, a clog exists.
Calibrate E-Steps and Flow Rate
E-steps tell your printer how many motor steps equal one millimeter of filament. If this is wrong, extrusion is wrong.
Calculate new e-steps:
- New e-steps = (Current e-steps × 10) / actual distance moved
- Example: if 8mm moved instead of 10mm, new e-steps = (200 × 10) / 8 = 250
Resolve Warping, Layer Shifting, and Over-Extrusion
These three issues often appear together because they share common causes: temperature, mechanical wear, and calibration drift.
Prevent Warping with Bed Temperature and Enclosure
Warping occurs when edges cool faster than the center. Increase bed temperature by 5-10°C for the first 5 layers to keep the base warm, then drop to normal temperature.
Check Belt Tension and Stepper Motor Calibration
Layer shifting means the printer moved in the wrong direction mid-print. This usually points to mechanical issues.
Reduce Over-Extrusion with Flow Adjustments
Over-extrusion makes prints look puffy and glossy. Layers are too thick, causing dimensional errors.
Reduce flow rate:
- Start at 100% in your slicer
- If over-extrusion appears, drop to 95%
- Retest
- Most materials print well at 95-100%
Line width adjustment:
- If your nozzle is 0.4mm, don't use line widths over 0.5mm
- Thinner line widths (0.35mm) reduce over-extrusion
- Wider widths (0.6mm) need lower flow rates
Optimize Supports and Cooling for Better Prints
Supports and cooling seem like minor details. They're not. They're the difference between prints that look good and prints that look professional.
Design Effective Support Structures
Supports are temporary scaffolding. Bad supports waste filament and leave ugly marks. Good supports are minimal and easy to remove.
Manage Cooling Fan Speed and Overhangs
Your cooling fan controls how fast filament solidifies. This affects quality dramatically.
Maintain Your Printer to Prevent Future Failures
Prevention beats troubleshooting. A well-maintained printer fails less often and produces better prints.
Clean Nozzles and Hot End Regularly
Your nozzle accumulates burnt filament, dust, and debris. This causes clogs and poor extrusion.
Deep cleaning (every 50 prints):
- Remove the nozzle completely
- Soak in acetone for 30 minutes (dissolves burnt plastic)
- Use a thin wire to clear any remaining debris
- Reinstall and test
Hot end inspection:
- Look for filament leaking around the nozzle
- Check that the heater block is secure
- Listen for unusual sounds during printing
Inspect V-Wheels, Eccentric Nuts, and Calibration
Your printer's mechanical parts wear over time. Regular inspection catches problems before they cause failures.
V-wheel maintenance:
- Spin each wheel by hand, they should rotate smoothly
- Clean wheels with a dry brush
- If a wheel is flat or damaged, replace it
- Check that wheels aren't too tight (should spin freely)
Eccentric nuts:
- These adjust the pressure of wheels against the rails
- Tighten if wheels are loose
- Loosen if you hear grinding
- Check every 50 prints
Calibration checks:
- Print a calibration cube monthly
- Measure dimensions with calipers
- If dimensions drift, recalibrate steps per mm
- Check bed leveling before every print
Store Filament Properly to Avoid Moisture Issues
Filament absorbs moisture from the air. Wet filament produces weak prints with surface defects.
Storage best practices:
- Keep filament in sealed bags with desiccant
- Store in a cool, dry place (below 50% humidity)
- Use dry boxes with humidity indicators
- Replace desiccant when it turns color
- Open filament bags only when needed
Drying wet filament:
- Use a filament dryer (65°C for 4-8 hours)
- Or use your oven at lowest setting (100-110°F) for 2-4 hours
- Test a small print after drying
- Discard filament that's been wet for weeks
Frequently Asked Questions
Why do my 3D prints keep failing?
Print failures typically stem from bed adhesion problems, incorrect nozzle temperature, filament moisture, or mechanical issues like belt tension. Start by inspecting where the failure occurred: first layer failures point to bed leveling or adhesion, mid-print failures suggest extrusion or temperature issues, and layer shifting indicates belt tension problems. Check your slicer settings against your filament specifications and ensure your build plate is clean and properly leveled before reprinting.
How do I fix a 3D print that detached from the bed?
First, clean your build plate thoroughly with rubbing alcohol to remove residue and oils. Level your nozzle using the paper test, ensuring consistent resistance across all corners. Lower your z-offset slightly so the first layer presses firmly into the bed. Consider applying a bed adhesion aid like glue stick or hairspray, or use a brim in your slicer to increase surface contact. If warping occurs, raise your bed temperature slightly and ensure your enclosure maintains consistent heat.
What causes 3D print stringing and how do I stop it?
Stringing occurs when filament oozes from the nozzle during travel moves between print sections. Enable retraction in your slicer and increase retraction distance by 1-2mm until stringing reduces. Lower your nozzle temperature by 5-10°C to reduce oozing, and slow print speed to 40-50mm/s for better control. If stringing persists, check for a clogged nozzle by performing a cold pull or replacing the nozzle entirely. Some materials like PLA benefit from higher retraction speeds around 40mm/s.
How can I tell if my 3D printer nozzle is clogged?
A clogged nozzle produces under-extrusion: thin lines, missing material, or gaps in your print. Visually inspect the nozzle opening with a magnifying glass for plastic residue or discoloration. Heat the nozzle to printing temperature and attempt to extrude filament manually using your printer's menu. If filament doesn't flow smoothly, perform a cold pull by heating to 200°C, loading filament, cooling to 50°C, and pulling firmly. For stubborn clogs, soak the nozzle in acetone or replace it entirely.
0 comments