
Table of Contents
- What You'll Need Before You Start
- Choosing the Best Software for 3D Modeling Gifts
- How to Add Text to 3D Models for Gifts
- Design Principles for Printable Custom Gifts
- Designing Personalized 3D Printed Gifts for Kids
- Preparing Your Design for 3D Printing
- Common Design Mistakes to Avoid
- Post-Processing and Finishing Your Custom Gift
- Frequently Asked Questions
Last Updated: October 3, 2026
What You'll Need Before You Start
To design custom 3D printed gifts, you need a computer capable of running 3D modeling software and internet access. You don't need expensive hardware, most modern laptops handle beginner-level design.
Gather reference images before you start. Find inspiration on design sites, photograph objects you want to replicate, or sketch rough ideas on paper to establish direction.
Understand STL files, the standard format 3D printers use. Think of it as the PDF equivalent for 3D objects.
If using a service like Bandit's Print Den, you don't need a printer. If printing yourself, you'll need a 3D printer, filament or resin, and a slicer program to test designs.
Choosing the Best Software for 3D Modeling Gifts
Choose software based on your skill level. Some tools are free; others require subscriptions. Find one that matches your experience.
Free and Beginner-Friendly Options
Tinkercad is ideal for beginners. This browser-based tool lets you drag and drop shapes, combine them, and export as STL, intuitive yet powerful enough for custom gifts.
Fusion 360 (free for personal use) is a professional CAD tool with tutorials and community support. Worth the learning curve if you're serious about 3D design.
Blender is free and open-source, powerful for sculpting and artistic designs, though it has a steep learning curve.
OpenSCAD uses code to build shapes, ideal for parametric design where you can adjust dimensions easily later.
Professional-Grade CAD Tools
SolidWorks and AutoCAD are expensive industry standards. Most custom gift designers won't need this level.
Meshmixer is free for editing existing 3D models, download, modify, add text, adjust tolerances, and export.
Pick one tool and stick with it. Switching constantly wastes time.
How to Add Text to 3D Models for Gifts
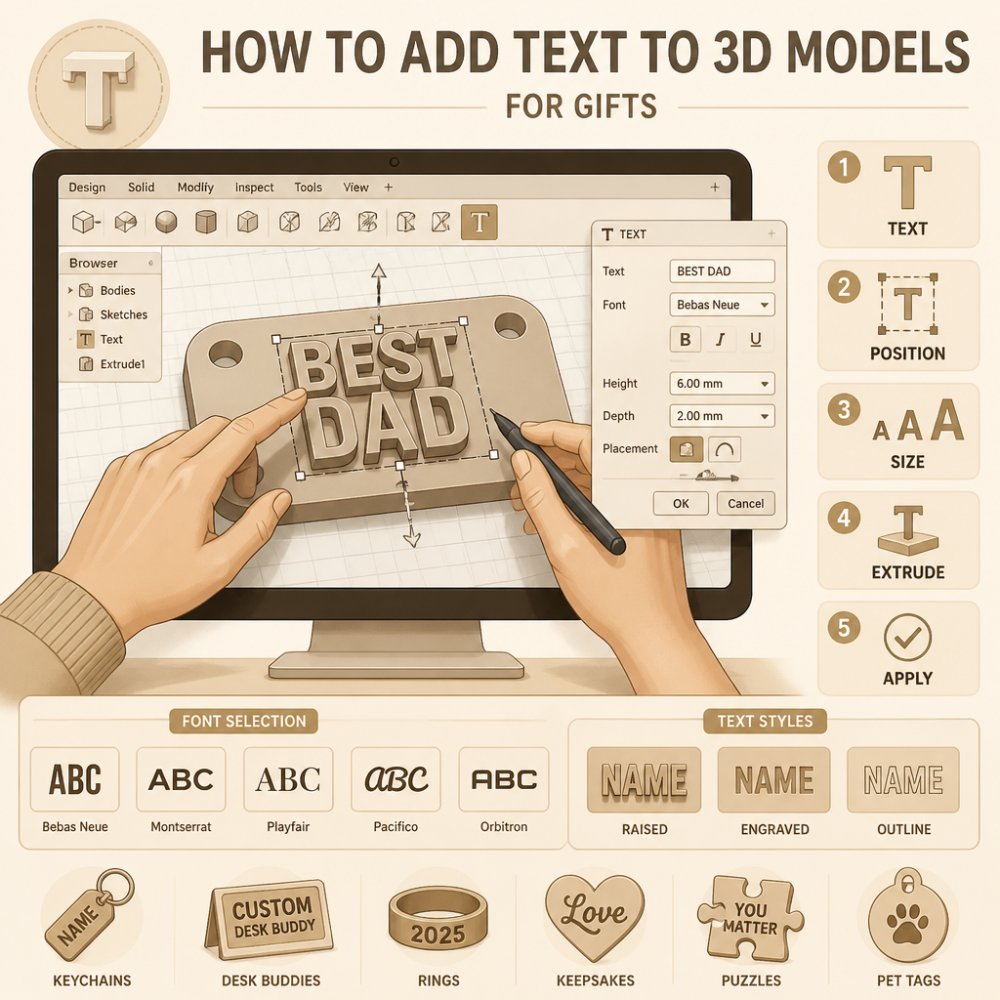
Text transforms a generic object into something personal. Adding names, dates, or short messages makes a gift feel handcrafted. Here's how to do it right.
In Tinkercad, use the "Text" tool to type your message, adjust size, and position it on your model. Export as STL.
In Fusion 360, create a sketch where you want text, then extrude it to create raised or recessed lettering.
In Blender, add text as a separate object, convert to mesh, and position it for complete control over depth and style.
Text depth matters: raised text needs at least 1-2mm thickness; recessed text needs at least 1mm depth. Too shallow and detail is lost; too deep looks clunky.
Sans-serif fonts (like Arial) print cleaner than serif fonts. Use bold, simple fonts that survive printing better.
Design Principles for Printable Custom Gifts
Not every design prints well. Understanding how 3D printers work saves frustration.
Understanding Layer Height and Infill Density
3D printers build objects layer by layer. For gifts, 0.2mm layer height is ideal, it prints fast enough while giving clean detail.
Infill density controls how solid the inside is. For gifts, 15-20% infill saves material and time while keeping objects sturdy. Functional items need 25-30%.
Wall Thickness and Support Structures
Every wall should be at least 1.5mm thick. Thinner walls crack and fail.
Support structures hold overhanging parts. Good design minimizes supports by orienting the model so gravity helps. Better design means less cleanup after printing.
Tolerances for Moving Parts and Assembly
For moving parts, aim for 0.3-0.5mm clearance between pieces. Test tolerances on small pieces first. Design parts that snap together or use press-fits for assembled gifts.
Designing Personalized 3D Printed Gifts for Kids
Kids' gifts have special requirements. They get dropped, chewed, and played with hard. Your design needs to survive that.
Avoid small parts. Anything under 5mm that could break off is a choking hazard. Check your design for small protrusions, thin details, or delicate features. If it could snap off, redesign it.
Round all edges. Sharp corners hurt and look unfinished. Use filleted or rounded edges throughout. This also helps the printer, sharp corners are harder to print cleanly.
Make it colorful. Kids respond to bright colors. Design with color in mind. You can print in bright filaments or paint after printing. If you're using a service like Bandit's Print Den, ask about color options when you place your order.
Build in durability. Thicker walls mean tougher toys. Use 2-3mm wall thickness for kids' items instead of the minimum 1.5mm. Increase infill to 25-30% for toys that get heavy use.
Consider noise and movement. A fidget toy with moving parts is more engaging. A figure with articulated limbs feels more like a real toy. Design with interactivity in mind.
Test for safety. If you're designing something a child will handle, think through worst-case scenarios. Could a part break and create a sharp edge? Could paint chip off? Could it get stuck on clothing? Design to prevent these issues.
When you design custom 3D printed gifts for kids, working with an experienced printer matters. Services like Bandit's Print Den handle the technical details and material choices that keep printed toys safe and durable.
Preparing Your Design for 3D Printing
You've designed something great. Now prepare it for the printer. This step determines whether your gift prints successfully or fails halfway through.
Exporting to STL Files and Checking Mesh Quality
Export your design as an STL file. Every 3D modeling tool has an export function. In Tinkercad, click "Export" and choose STL. In Fusion 360, right-click the model and select "Save as STL."
Custom NFC Social Media / Vendor Keychain →
An STL file is a mesh, which is just a collection of tiny triangles that describe your shape. A good mesh has no gaps, holes, or overlapping triangles. A bad mesh confuses the printer.
Check your mesh quality before printing. Use free tools like Meshmixer or Netfabb to inspect the file. These tools highlight problems: holes in the surface, non-manifold edges, or reversed faces.
Common mesh problems:
- Holes in the surface that should be solid
- Inverted faces where the inside and outside are flipped
- Duplicate faces that overlap
- Non-manifold geometry where edges connect incorrectly
Most of these are easy to fix. Meshmixer has healing tools that automatically repair common issues. Run the repair, re-export, and you're done.
Using a Slicer to Test Print Settings
A slicer converts your STL into instructions the printer understands. It slices the model into layers and generates the path the nozzle will follow.
Popular slicers include Cura (free), PrusaSlicer (free), and Simplify3D (paid). Load your STL, and the slicer shows you a preview of how it will print.
Use the preview to catch problems:
- Does the model have supports where it needs them?
- Are any parts floating or disconnected?
- Does the orientation make sense (is it printing on a stable base)?
- Are there any overhangs that might fail?
Adjust settings in the slicer:
- Layer height (0.2mm for most gifts)
- Infill (15-20% for non-functional items)
- Support type (tree supports use less material than linear supports)
- Print speed (slower is better for detail)
Run a test print on a small section if possible. A 30-minute test print on a corner of your design catches problems before you waste four hours printing the whole thing.
Common Design Mistakes to Avoid
Most failures come from a few predictable mistakes. Learn these now and save yourself frustration.
Thin walls collapse. Walls under 1.5mm fail during printing or break after. Check every wall thickness in your design. Use the measurement tool to verify.
Overhangs print poorly. An overhang is any part that extends outward without support below it. The printer can't print plastic in midair. Either add supports (which you remove later) or redesign to avoid overhangs.
Small details disappear. Features under 0.5mm are too small for most printers to resolve. A thin line, small hole, or delicate texture becomes a blur. If detail matters, make it bigger.
Unsupported bridges fail. A bridge is a horizontal span between two points with nothing underneath. Bridges longer than 10mm usually sag or snap. Support them or redesign.
Enclosed cavities trap resin or powder. If your design has a hollow space with only a tiny hole, cleaning it after printing is impossible. Add larger drainage holes or redesign to avoid enclosed spaces.
Mismatched scales confuse the design. A giant hand holding a tiny object looks wrong. Keep proportions consistent. A human figure should be roughly human-proportioned.
Forgetting about bed adhesion. The bottom of your print needs to stick to the build plate. A model with a tiny footprint or sharp point might tip over. Design a stable base or plan to print at an angle.
Test your design mentally. Imagine the printer building it layer by layer from bottom to top. Where would it struggle? Fix those spots before printing.
Post-Processing and Finishing Your Custom Gift
The print comes off the printer looking rough. Post-processing transforms it into a finished gift.
Remove supports. Supports leave marks and rough spots. Use pliers or a hobby knife to snap them off. Sand the spots smooth afterward.
Sand the surface. Start with 120-grit sandpaper for rough spots and layer lines. Progress to 220-grit, then 400-grit for a smooth finish. Sand in circular motions and be patient.
Fill gaps. If your print has small holes or gaps, use plastic filler or epoxy putty. Smooth it with sandpaper once dry.
Paint or stain. A coat of paint transforms a plain printed object. Use spray paint for smooth coverage or brush-on paint for detail work.
Add texture. After painting, consider adding texture. Dry brushing (applying paint with a nearly-dry brush) creates depth. Weathering techniques make objects look aged or used.
Seal the surface. A clear coat protects paint and gives a professional finish. Spray sealant or brush-on polyurethane both work.
Polish for shine. For a glossy finish, use polishing compound and a soft cloth. Work in small circles until the surface gleams.
The time you spend on post-processing determines whether your gift looks like a toy or a professional product. Most people underestimate this step.
For complex or detailed work, consider professional finishing. Services like Bandit's Print Den handle post-processing that brings your design to life.
Designing custom 3D printed gifts combines creativity with technical precision. The process takes practice, but each project teaches you something. Start simple, test your designs thoroughly, and don't rush the finishing work.
Frequently Asked Questions
Can I design 3D printed gifts if I have no CAD experience?
Yes. Free software like Tinkercad and Fusion 360 (free for personal use) are designed for beginners and require no prior experience. Both offer tutorials and drag-and-drop tools that make 3D modeling approachable. Start with simple shapes and gradually add complexity. Many successful custom gifts come from straightforward designs, a personalized nameplate or simple articulated figure doesn't require advanced CAD skills.
What software is best for designing custom 3D printed gifts?
For beginners, Tinkercad and Fusion 360 (free tier) are excellent starting points. Blender is free and powerful for sculpting and organic shapes. For professional work, SolidWorks and Rhino offer precision and parametric design. Your choice depends on your design style: Tinkercad for blocky items, Blender for artistic figures, Fusion 360 for functional designs with tolerances and assembly.
How do I ensure my custom 3D design will actually print without failing?
Export your design as an STL file and load it into a slicer (Cura or PrusaSlicer are free). The slicer shows you layer height, infill density, and support structures the printer will use. Check for thin walls (under 1.5mm), overhanging sections that need support, and sharp points that may break. Most slicers highlight problem areas in red. Test with a small print first if you're uncertain about tolerances or moving parts.
What makes a custom 3D printed gift from Bandit's Print Den different from downloading a free design online?
Downloading a pre-made design gives you a generic result, the same figure thousands of others own. Bandit's Print Den creates truly custom work tailored to your vision. Our quality-control expert Bandit ensures every print meets high detail standards. You're paying for unique design work and meticulous finishing, not just the printing service.
0 comments